Tag Archives: pie

Key Lime Pie – Spring is Here

3 May

Spring makes me happy. There is nothing nicer than warming temperatures and spring flowers. 

Flowers

Thanks for the beautiful bouquet, hubby!

I recently went on a quick jaunt to the Florida Keys – it rained the whole time, but it didn’t prevent me from tasting “the world’s best key lime pie” at Mrs. Mac’s Kitchen in Key Largo.  Although many places we passed made similar claims about their pie, it was indeed the best key lime pie I have ever eaten.  I knew I had to replicate it at home so I schlepped a lb of key limes back with me to New Haven.

Keylimes

Since I like a challenge and am always trying to eat less wheat, I decided to make a gluten free “graham cracker” crust.  Although it wasn’t as beautiful as I would have liked, the taste hit the spot. It has great crumbly texture and the perfect graham flavor.  Hubby claims it’s better than any graham cracker crust he’s ever tasted – but I’m never sure if he’s just misremembering. Either way, it rocks. And it’s gluten free.

KeyLimePieCrust

While reviewing tons of recipes, I came upon a raging argument over whether whipped cream or merengue was a more authentic topping.  Since Mrs. Mac’s used whipped cream (as did the 70’s style key lime pie post card I bought), I did too. Which ever you choose, I recommend whipping up one of these – it is super easy and is bursting with spring flavor.

KeyLimePie

Continue reading

Homemade Pumpkin Pie (and Miette – a brief review)

28 Dec

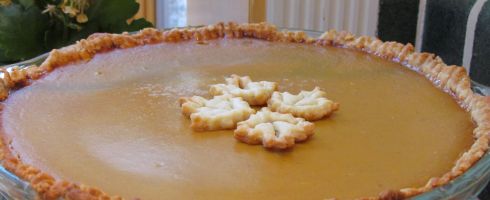
So I know that I’ve told you about my love of pie, but I’m not sure I’ve mentioned much I love pumpkin pie. Or pumpkin bread. Or pumpkin beer (or all things pumpkin, really). This pumpkin pie is outstanding and the homemade pumpkin puree truly makes it extra special.

On another note, I’ve decided to experiment with cake baking – or rather, cake decorating.  I recently bought the Miette cookbook.  Besides being an absolutely gorgeous book, replete with scallop-edged pages and stunning photography, it provides detailed instructions for recreating the small cakes from the Miette, the San Francisco based bakery.  There are tips for leveling cakes, cutting layers, and making frosting even, or textured when appropriate.  It shows you how to make a gorgeous, shiny ganache coated cake. Best of all, it shows you how to make your cake so beautiful people will be briefly hesitate to cut into it. For the first time, I feel like I might actually be able to make my cakes look truly beautiful.  Thank you, Meg Ray, for making me believe that with the right tools, I can make cake masterpieces too.

I went out (read: went to Amazon) and bought some of the tools needed to make the cakes.  The tool that seems to be most crucial for cake decoration is a rotating cake plate, which allows for even (perfect) application of frosting (along with some 6 inch cake pans, of course).  I am so excited for my order to arrive so I can try out a cake (to share with you of course).  Look out for my cake baking action and a giveaway….

Ingredients:

1 cup packed light-brown sugar

1 tablespoon cornstarch

½ teaspoon salt

1 teaspoon ground ginger

1 1/2 teaspoons ground cinnamon

1/8 teaspoon ground cloves

1 ½ cups fresh Pumpkin Purée , or canned

3 large eggs, lightly beaten, plus 1 egg for glaze

1 ½ cups evaporated milk

1 pie crust

1 tablespoon heavy cream

Directions:

Preheat oven to 425°. Line a baking sheet with parchment paper and set aside. In a large bowl, combine sugar, cornstarch, salt, ginger, cinnamon, cloves, pumpkin purée, and 3 eggs. Beat well. Add evaporated milk, and combine. Set aside.

Roll crust into a 12-inch circle, between two pieces of plastic wrap. Fit pastry into a 9-inch glass pie plate; trim dough evenly along edge, leaving about a 1/2-inch overhang. Pinch to form a decorative edge. If the dough begins to soften, chill for 15 minutes.

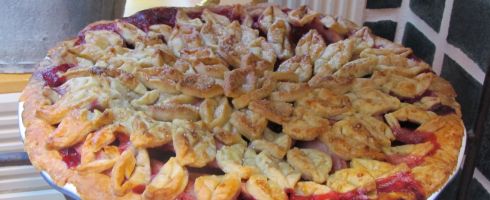
For decorative flair, cut out a few leaf shapes with excess dough pieces, using a pairing knife or pie crust cutters.  Put the leaves on a small plate and freeze.

Beat the remaining egg, and combine with heavy cream. Brush the glaze very lightly on edges of pie shell. Fill pie shell with pumpkin mixture. Transfer to prepared baking sheet.

Bake for 10 minutes. Reduce heat to 350°, and continue baking for 45 minutes more, or until set (it will be mostly still when you lightly jiggle it).  You can use a crust guard or ring of foil if crust starts to get too brown . (or much longer) Cool on a wire rack. Bake leaves for about 10 minutes, or until golden brown and gently place them in the center of the cooling pie.

Barely adapted from Martha Stewart

Fluffy Pecan Pie

16 Dec

Something you will learn about me: pie is my favorite dessert.  Be it a tart, crostata, or standard pie, custard, cream or fruit, I like them in all shapes and sizes.  My wedding featured pie centerpieces (rather than the traditional cake) and each guest had a flavor to sit at rather than a table number.  We passed around pie pops.  If I hadn’t decided to plan and execute the whole thing myself, I may have even given pie favors.

Pie pops

This is where I curse myself for not having photorapher take more decor pics…

But I digress….

This is the best pecan pie ever. I kid you not; the ground pecans allow you to get nuts in every bite and experience a perfect nut/filling ratio. I got the recipe from my cousin a couple years ago, and have been making it every Thanksgiving since. If you are looking for a pie to make for the holidays, this is the one. It is simple and a definite crowd-pleaser.

Ingredients:

1  single pie crust recipe
1/3 C butter
3/4 C brown sugar
3 eggs
1C light corn syrup
1C pecan halves, ground (I do it myself from pecan halves in food processor to make sure there’s no shells)
1t vanilla
1/4 t salt
pecan halves

Directions:

Preheat oven to 350 degrees. Cream sugar and butter.  Add in eggs, one at a time, mixing slowly. Add corn syrup and beat.  Add ground pecans, vanilla, and salt, and beat until combined.  Pour into crust and decorate with pecan halves. Put on a cookie sheet and bake for 50 mins or until set.

I made this one for Thanksgiving, but failed to get many good pictures of it. It sure was tasty though.

Blackberry Apple Pie

29 Nov

This is the third time I’ve made this pie and it was – visually – the best. It was delicious too, but if you are interested in trying out a a fancy crust with your next fruit pie, this one is awesome.

I used my vegan version of Martha’s pie dough recipe.  The flakiness of this dough may have contributed to how well the pie came out.   In order to make the beautiful leaves, you can use a paring knife, a leaf cookie cutter, or one of these special pie crust cutters.  I have a set of leaf pie crust cutters and they make the job a lot easier.  I made this with a star layered top for the fourth of July once too – it was a definite winner at that holiday table as well.

Ingredients:

1/4 cup plus 2 tablespoons granulated sugar
2 tablespoons cornstarch
1/2 teaspoon ground cinnamon
1/4 teaspoon salt
2 1/2 pounds assorted apples (I used Cortland and Granny Smith), peeled, cored, and cut into 1/4-inch-thick slices
1 12 oz bag frozen blackberries, thawed
1 pie crust recipe1 ounce (2 tablespoons) cold unsalted butter (or substitute – I used Earth balance), cut into small pieces
1 large egg yolk, lightly beaten with 1 tablespoon water, for egg wash (you can substitute just water if you are vegan)
Sanding sugar, for sprinkling
Directions:
Whisk together granulated sugar, cornstarch, cinnamon, and salt in a large bowl. Add apples and blackberries, and toss to coat. Pour filling into prepared piecrust, and dot with butter/butter substiute.
Preheat oven to 400 degrees with rack in lowest position. Meanwhile, brush rim of piecrust with egg wash. Arrange dough leaves over filling, creating a spiral from the edge into the center, overlapping leaves slightly to cover pie but leaving some openings. Lightly brush tops of leaves with egg wash as you work, to help them adhere. Once filling is covered with leaves, lightly brush top of entire pie with egg wash. Sprinkle with sanding sugar.

Put in freezer for 10 – 30 minutes.

Place pie on a parchment or foil lined baking sheet. Bake until crust is golden, about 20 minutes. Reduce heat to 350 degrees. Bake pie, rotating sheet halfway through, until juices are bubbling in the center and crust is golden brown, about 1 hour and 30 minutes more. If the crust starts to become too crispy, tent with foil.

Transfer to a wire rack, and let cool completely and then enjoy. So delicious!

Barely adapted from Martha Stewart

Pie Dough

28 Nov

I strongly believe that if you have some extra time, you should make your pie dough from scratch.  It is relatively easy and can be made up to 2 months in advance. If you have a food processor, it is a complete cinch – if not, you just have to sweat a little more.

This first recipe is for my favorite all butter recipe – Martha Stewart’s Pate Brisee.   I have also adapted it to make a vegan equivalent. No matter which one you choose, THE KEY to a flaky crust is keeping it cold and not overworking it.  The reason you cut the fat (butter or shortening) into small pieces it to leave small clumps of fat that can burst in the oven and create layers (or flakes) in the crust.

Both crusts make enough for two 9″ pies or 1 two-crust pie. They can also both be used for savory or sweet pies. Yum!

Ingredients for all butter crust:

2 1/2 cups all-purpose flour
1 teaspoon salt
1 teaspoon sugar
2 sticks unsalted butter, chilled, cut into small 1/2 inch cubes, then frozen until ready to use
1/4 to 1/2 cup ice water
~~~~~~~~~
 Ingredients for vegan crust:
2 cups all-purpose flour
1/2 teaspoon salt
1 tablespoon sugar
2 sticks Earth Balance, chilled, cut into small 1/2 inch cubes, then frozen until ready to use
4 tablespoons ice water

Directions (for both types of crust):

FOOD PROCESSOR:

In the food processor, combine flour, salt, and sugar.

Add butter (or butter substitute), and process until the mixture resembles coarse meal, 8 to 10 seconds.

While the machine is running, add ice water in a slow, steady stream through feed tube. Pulse until dough holds together – it shouldn’t be wet or sticky. Try not to pulse for very long, as the longer your work it, the warmer the butter gets. To test, squeeze a small amount together: If it is too crumbly, add more ice water, 1 tablespoon at a time.

Divide dough into two equal balls.

Flatten each ball into a disc and wrap in plastic. Transfer to the refrigerator and chill at least 1 hour. Dough may be stored, frozen, up to 2 months.

When you are ready to use the dough, roll out between two sheets of plastic wrap, flipping occasionally as needed. Roll until the dough is roundish (can fit into bottom of pan) and is evenly 1/4 ” thin.

BY HAND:

Combine dry ingredients using a fork.  Add butter and mix using a pastry knife or two knives to blend in butter/butter substiute.  Stop when it resembles small peas in the flour.  Try not to overwork, as you want the butter to stay COLD.  Add the water a tablespoon at a time, using the pastry knife. Then, follow the rest of the food processor steps…